

What is Ansible?
Ansible is a world leading automation and configuration management tool. At GigeNET we heavily invest in the use of Ansible as our automation backbone. We use it to manage deployments on a large array of our platforms from our public cloud’s 1-Click applications to managing our own internal systems desired configurations.
Have you asked yourself questions like, “Why should we invest our resources in utilizing Ansible?”and “How Ansible can simplify our application deployments” or “How can Ansible streamline our production environments” lately? In this Ansible Playbooks Tutorial, I will demonstrate the ease of kick starting Ansible development and how simple it is to start building your desired infrastructure state.
The Basics.
The information technology industry likes to develop new terminology. Ansible has fallen into this and has willed their own terminology related to their toolkits.
Key Ansible Language:
Ansible Playbooks: A set of instructions for Ansible to follow. This normally includes a target to run these instructions sets on, a collection of variables for the roles you execute, and the roles themselves that will be executed.
Inventory: A group or collection of systems in which to execute your Playbooks against.
Tasks: A task is a XML statement that tell Ansible what actions to perform. These statements often involve calling modules.
Roles: A series of tasks that work together to execute the desired state you set out to design.
Modules: A prebuilt script that Ansible uses to run actions on a target. A full list of built-in modules is documented on Ansible’s website here.
The Workstation Setup.
The recommended setup for Ansible is to have a centralized server setup for your “Workstation.” The workstation is where you will keep all of your playbooks, your roles, and manage your system inventory. The install process of Ansible is pretty relaxed and only has a single requirement: You must have python installed.
How to set up your workstation on CentOS 7:
The first thing we will need is to ensure we have python and the python pip extension installed.
[ansible@TheWorkstation ~]$ sudo yum install python-pip -y
With the install of python-pip we will install the Ansible tools through Pip. Most operating systems have a system package for Ansible, but it has too many limitations for my taste. You must wait for the package maintainer to update the Ansible version, and often time they are behind what is considered stable. Pip is a package manager, but only manages python packages. In this case we will utilize Pip to perform the install and configure the Ansible configuration file manually to suit our needs.
[ansible@TheWorkstation ~]$ sudo pip install ansible===2.4.0.0
[ansible@TheWorkstation ~]$ mkdir playbook inventory roles modules
Place this configuration file into the Ansible playbooks directory. We will utilize these configuration flags to prevent host key problems, set the system path of our roles, and modules directories. In a production environment you will want to keep host key checking enabled due to security implications. You can read more about the configuration options here.
ansible@TheWorkstation ~]$ cat <> Playbooks/ansible.cfg
> [defaults]
> host_key_checking = False
> library = /home/ansible/modules
> roles_path = /home/ansible/roles
> EOF
The Inquisition.
Let’s get our hands dirty, and dive into the actual development of a Ansible role. It’s best to think of roles as a set of instructions for Ansible to follow. The initial creation of a role will be building out the recommended directory structure for the role. We will build a small role in the Playbooks directory that will update a system and install Nginx. Let’s get started!
[ansible@TheWorkstation Playbooks]$ mkdir -p roles/MyRole/tasks roles/MyRole/handlers roles/MyRole/files roles/MyRole/templates roles/MyRole/defaults
[ansible@TheWorkstation Playbooks]$ touch roles/MyRole/tasks/main.yaml roles/MyRole/templates/main.yaml roles/MyRole/defaults/main.yaml
Before we start building the Ansible tasks you’ll need to have a desired configuration goal in mind. My natural first step is to determine what I want accomplished and what state I want the system to be in. For this example our goal is to build a simple Nginx role, and with the system to have Nginx installed and a simple website displayed. To get to this desired system state I normally spin up a virtual machine on Virtualbox or on a Cloud instance provider like GigeNET. Once I have a temporary work environment I tend to document each command used to get to my stated goal.
These are the manual commands required to get a simple Nginx configuration on CentOS:
[ansible@TaskBuilder ~]# sudo yum update -y
[ansible@TaskBuilder ~]# sudo yum install epel-release -y
[ansible@TaskBuilder ~]# sudo yum install nginx -y
[ansible@TaskBuilder ~]# sudo service nginx start
[ansible@TaskBuilder ~]# sudo chkconfig nginx on
You should now be able to view in your browser a “Welcome to Nginx” website on the temporary environment.
Now that I know the tasks required to build a role I can start translating these commands to Ansible modules. I start by researching the Modules in the link listed previously in this blog post. We utilize “yum” on our manual adventure so I’ll try to find the exact “yum” module on the website listing. Below is a screenshot that documents the module. You can click on it for a more detailed summary.

With the documentation of the module we can start translating our commands to Ansible tasks. We will utilize two parameters on the yum module: name and state. Documented on the yum modules page are the details and how-to uses these parameters.
Name: Package name, or package specifier with version.
State: Whether to install (present or installed, latest), or remove (absent or removed) a package.
Now that we have the correct module information let’s translate it to something usable on our workstation. Ansible looks for the main.yaml file under the tasks directory to initiate the role.
Here is one of the main files we have previously touched on earlier:
[ansible@TheWorkstation ~]$ cat <> roles/MyRole/tasks/main.yaml
—
– name: Upgrade all packages
yum:
name: ‘*’
state: latest
– name: Install EPEL Repository
yum:
name: httpd
state: latest
– name: Install Nginx
yum:
name: nginx
state: latest
> EOF
The Inventory File.
The Ansible inventory file is a configuration file where you designate your host groups and list each host under said group. With larger inventories it can get quite complex, but we are only working towards launching a basic role at this time. In our inventory file we create a group named Target, and we set the IP address of the host we want our playbook to run the role against.
[root@TheWorkstation ansible]# cat <> Inventory/hosts
> [target]
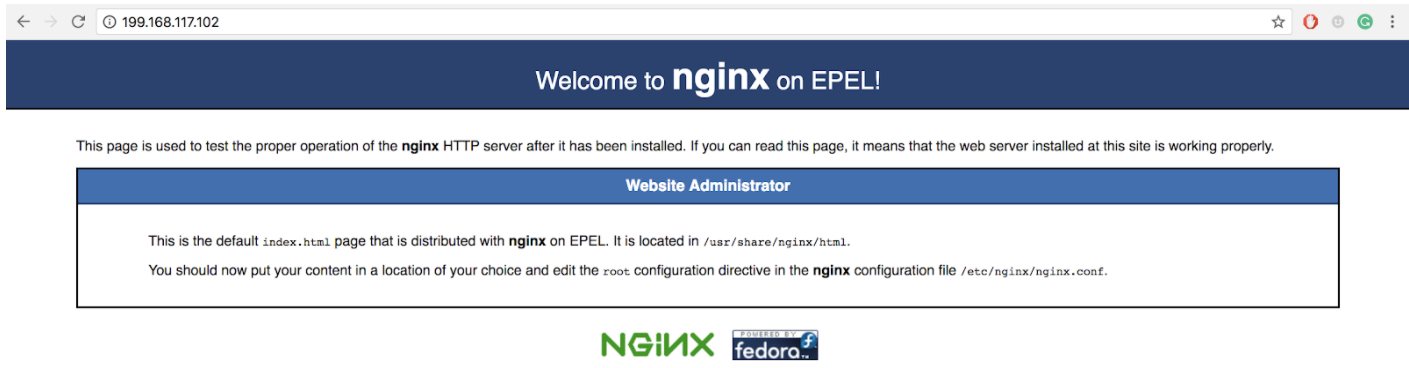
> 199.168.117.102
> EOF
The Playbook.
Now that we have a very basic role designed, we need a method to call our role. This is where the Ansible playbook comes in. You can view the role as a single play in a NFL coach’s arsenal and the inventory as the actual team. The playbook is the coach and coach decides which plays the team runs on the field. Previously we built an inventory file with a group named target. In the playbook we designate that our hosts will be every system under the target group. We then tell the playbook to use our role MyRole.
[root@TheWorkstation ansible]# cat <> Playbooks/MyPlay.yaml
> —
> – hosts: target
> roles:
> – MyRole
> EOF
The Launch.
Now that we have the very basics finalized. It’s time to launch our very first Ansible playbook. To launch a playbook, you would simply run the Ansible Playbook with the inventory file and playbook we configured earlier.
[ansible@TheWorkstation Playbooks]$ ansible-playbook -i ../Inventory/hosts MyPlay.yaml -k
If everything worked out you will see the following output:

Interested in more tutorials and tips? Check out the GigeNET blog.
Already have enough on your plate? Explore GigeNET’s managed services.
