How To Set Up A Complex Syncthing Network
Friday April 6, 2018
What is Syncthing?
Syncthing is a decentralized file synchronization tool. It shares similarities with commercial cloud storage products you may be familiar with, like Dropbox or Google Drive, but unlike these cloud storage products, it does not require you to upload your data to a public cloud. It also shares similarities with self-hosted cloud storage platforms like ownCloud or NextCloud, but unlike those products, it does not require a central server of any kind.
Syncthing works off of a peer-to-peer architecture rather than a client-server architecture. Computers attached to your Syncthing network each retain copies of the files in your shared folders and push new content and changes to each other through peer-to-peer connections. Unlike other peer-to-peer software you may be familiar with, like file sharing applications, Syncthing uses a private sharing model and only devices specifically authorized with each other can share files. All communication between the peers is encrypted to protect against man in the middle attacks intercepting your private data.

My Syncthing Use Case
In my case, I have a library of almost 3TB of data consisting of over 250,000 files in over 20,000 directories. Most of these files average between 5MB and 100MB in size. There are currently 4 people working on the project who need access to the files. We each need the ability to add, remove, and edit items in the library with the changes synchronizing out to everyone else.
Faced with the challenge of mirroring this rather considerable amount of data between multiple computers, we have gone through a variety of solutions to decide what will work best for us.
The original setup was a central server where we all pulled backups via rsync. This had the advantage of simplifying change synchronization, since we always trusted everything on the central server to be the latest copy of the data. However, it made it more difficult to make updates since we would have to login to FTP to update the data, even though we all had a local copy. The real Achilles heel of this method, for us, was the need for a central server which raised the cost of our project, especially considering the amount of data we were hosting.
We looked into alternative cloud sync tools such as ownCloud and NextCloud, but again these do require a central server. We could have made one of our home servers the central server, but that would have consumed a lot of bandwidth for one of us. We looked at cloud storage solutions as well, but due to security concerns and the sheer cost of hosting 3TB on the cloud at the time, this didn’t seem practical for us either.
Syncthing Tutorial
Enter Syncthing – a peer-to-peer file synchronization tool without the need for a central server. This solution was set up to be the most cost effective and simple way for us to manage our collections. Once set up, our computers would propagate changes to each other, still using a bit more bandwidth than we did when we had the central server, but at least that burden was distributed equally. It seemed like a great solution since we all had a copy of the files anyway and wanted it to stay that way, and since it allowed us to also begin editing the files locally on our own machines rather than going through a process to get them on the central server.
With all of these benefits, we decided to give it a try, and started using it day to day. It was impressive how we were each able to connect our existing folders (since they were rsynced with each other up to this point, they had the same contents). So we didn’t even have to go through a painful initial sync process. Once Syncthing was set up on all of our machines, it scanned the files and communicated with the other peers to make sure everyone had the same content. Once that was complete, everything was in sync and we were ready to go.
How Syncthing Works
Syncthing enables the sharing of folders on your computer in a peer-to-peer manner. There is no central server or authority to manage the files, and you authorize peers in your client to allow them to connect and begin sharing the folder with you.
Peers connect directly to each other over the Internet in order to share data. This is the fastest and most secure method offered by Syncthing, since the data goes directly from one peer computer to the other with no central server or middle man handling the data. This method does require a firewall port to be opened on your network in order to communicate with peers that aren’t on the same network. By default, Syncthing uses TCP port 22000 for this purpose.
If you are syncing between servers or other Internet connections having a static IP address, you could easily lock down your firewall to only allow connections to this port from known IP addresses of your other peers, for additional security if that is a concern for you.
In some cases, direct peer connectivity is simply not possible, such as if you are behind a corporate or school network’s firewall or carrier NAT where you do not have access to the router to ask for a port to be forwarded. In these cases, Syncthing still is able to work, but it will adjust its connection strategy.
If connectivity is not possible directly between peers for any reason, Syncthing will fall back to using a relay server. In this case, you are adding a middle man to your connection, which generally does result in reduced performance. However, since Syncthing uses end-to-end encryption, these relay servers should not be able to see what data you are relaying through them.
The public relay servers used by default are operated for free by members of the community, and anyone can run a Syncthing relay. Relay servers do not store any data, they simply act as a proxy between peers that are unable to connect directly. So, you do not need a server with a lot of disk space to run a relay, but they can use a lot of bandwidth.
In some cases, you may need to use the relay functionality but do not want to rely on public relays out of security concerns, or maybe you simply want to have better performance by running your own private relay. Syncthing makes this possible as well through private relay pools. This still does create a centralized point for your Syncthing environment, but it is only used if the peer-to-peer connection is not possible. If you set up your Syncthing relay on a high speed server provider, like GigeNET, you can rest assured that your relay will operate in a fast and secure manner while you continue using Syncthing to enhance your project.
If you are interested in running a relay, be it a public relay for the good of the community or a private relay for your own project using Syncthing, the official documentation on the process can be found here.
How To Install Syncthing
A typical Syncthing installation will use simply the Syncthing Core application, which provides a command line tool and a Web UI of Syncthing. You can download the version of Syncthing Core for your operating system. There are pre-built packages for most Linux distributions, Windows, MacOS, and other popular operating systems.
The exact procedure for installing may vary from system to system, but for most Linux platforms, you simply need to download and extract a tar.gz archive, then run the Syncthing binary to launch the program.
By default, the Web UI will be available while Syncthing is running on https://localhost:8384/. You can access the Web UI on the local computer through a web browser, or by setting up an SSH tunnel if it is running on a remote server.
Additionally, you can configure Syncthing’s Web UI to listen on other IPs besides localhost if the need arises. Further documentation on this process is available here.
Connecting To Your First Peers on Syncthing
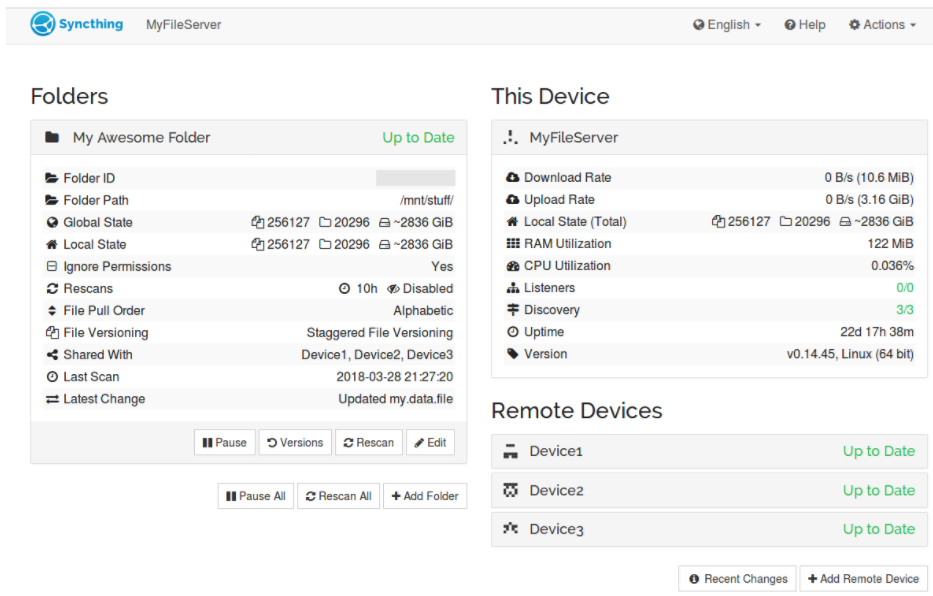
Connecting another peer to a shared folder for the first time is a very straight forward process. You will need to know their Device ID, which you can obtain by going to Actions > Show ID on the upper right corner of the web UI. The Device ID is an alphanumeric string that looks similar to a product license key.
To add the peer, click on the “Add Remote Device” button, which you’ll find toward the bottom left corner of the web UI. On this dialog, enter the device ID provided by your peer who you wish to connect.
You can enter anything you want for the Device Name, it is for your reference only so you know who the peer is. Generally, you can leave the address setting as “dynamic”, which will allow Syncthing to autodiscover the remote address for you.
If you would like the new peer to be able to add other devices to your shared folder, you can add them as an “Introducer” by checking that checkbox. This way, if your peer authorizes a new device on the folder, that peer will be introduced to you and you will begin sharing with them directly without any other steps required.
If you would like the peer to be able to create new shared folders and add them to your Syncthing easily, you can check the “Auto Accept” checkbox which will allow them to do just that.
Lastly, you simply need to check any checkboxes next to folders that you want to share with this peer. Once all of these steps are completed, simply click save, and allow Syncthing some time to connect to the peer. You should be on your way to syncing!
My Syncthing Review
Is Syncthing perfect? No, of course not.
Syncthing is a free open source application, and it’s not without its imperfections, but it works pretty well and development continues on the project every day. I still plan to use it for a long time to come, despite its imperfections.
I’ve found that with my massive library of files, the default rescan interval is too high for me and creates excessive server load. If you are sharing a very large library (say, hundreds of thousands of files), you too may want to increase your scan interval. Keep in mind, that this will increase the time between a change being made on Syncthing and that change propagating out to your peers. If you want to change this setting, you can do this by clicking the Edit button attached to the specific shared folder from the web UI, and adjusting the value of the setting “rescan interval” under advanced settings. I set mine to 36000 seconds (10 hours) to keep my server load down, since I don’t add files that often. Even with this scan interval, if I want to push changes out right away, I can simply go to the web UI and click the resync button to initiate an immediate scan.
Another pet peeve of mine is I’d like to see better support for the propagation of deletion events. I’ve found that if I delete a file while a peer is disconnected from Syncthing, when that peer eventually reconnects, they will sync back my deleted file to me. This can get really annoying, and sometimes causes me to hold off on making changes if one of my peers is offline for some reason. I would like to see some kind of global “deletion event roster” so that these delete events are not ignored by reconnecting peers, but it seems that Syncthing isn’t doing that yet.
I do sometimes have trust issues with Syncthing, because I’ve encountered some glitches in the web UI that make it seem like there could be a problem, but most of these concerns have been unfounded and Syncthing has done a great job managing my data. I’ve had some instances where the web UI will say that I am hundreds of gigabytes out of sync with my peers, and it appears to be actually syncing data, but not really using any bandwidth. Glitches like this reduce my confidence, but after using it safely for some time, I have learned to trust it even when the web UI is acting bizarrely.
Conclusion
Overall, what Syncthing accomplishes is a challenging task to pull off, and it does a pretty good job of it. I would love to see further development on the project, and I’ve seen new functionality and better interface polishing introduced in the timeframe that I’ve been using it. I think it will only continue to improve with the passage of time, and I definitely think it’s worth a serious look for your file synchronization needs.
Interested in more tutorials and tips? Check out the GigeNET blog.
Already have enough on your plate? Explore GigeNET’s managed services.