Centralized Linux Authentication
Thursday September 27, 2018
Until recently, Linux authentication through a centralized identity service such as IPA, Samba Active Directory, or Microsoft Active Directory was overly complicated. It generally required you to manually join a server or workstation to a company’s domain through a mixture of Samba windbind tools, and kerbose krb5 utilities. These tools are not known for their ease of use and can generally lead to hours of troubleshooting. When kerbose was not applicable due to networking a limitation, an administrator had to resort to an even more complicated set of configurations with OpenLDAP. This can be frustrating to deal with and had led some to deploy custom scripts to manage user management. I have seen administrators utilize Puppet, Chef, and Ansible to roll out user management. At GigeNET, we are guilty of this with our Solaris systems. The bulk of our architecture is Linux based, and we now manage the authentication through Microsoft Active Directory.
The complexity of joining a domain has been severely diminished. The Linux community understood these tools were not ideal to manage, and have come up with a new solution. They introduced the System Security Services Daemon (SSSD). System Security Services Daemon (SSSD) is a core project which provides a set of daemons to manages remote authentication mechanisms, user directory creation, sudo rule access, ssh integration, and more. Even still the SSSD configuration can be quite complex on its own. Each component requires you to understand each of the underlying utilities I brought up in the introduction. While it’s good to understand each of these components it’s not fully necessary as, once again, the Linux community banded together to build a few tools that wrap around SSSD. In earlier Linux distributions the tool was called adcli. The tools to manage the integration processes is now referred to as realmd on most distributions. You can do most basic user administration with the realmd command. I have added a snippet of how one can easily join a domain:
* Resolving: _ldap._tcp.gigenet.local.
* Performing LDAP DSE lookup on: 192.168.0.10
* Performing LDAP DSE lookup on: 192.168.0.11
* Successfully discovered: gigenet.local
realm: server001 has joined the domain
With the snippet above you should have noticed it will look up the DNS of the domain and will try to perform a join. On the backend, this utilizes the net join command from winbind. This command will also build out a basic SSSD configuration file. If the join was successful we should now be able to utilize any user account within our domain. I normally perform a quick ssh login with my domain username. If successful you should notice that you are logged in, and a directory for the user account should have been created.

Doing research on SSSD I didn’t find any full-blown examples for a user’s SSSD configuration file. I believe in transparency and have included a templated example of our internal configuration file. It’s very basic in design and works on a few hundred internal systems without complaint. Please note we have substituted our real domain in this example for gigenet.local.
config_file_version = 2
services = nss, pam, ssh, sudo[ssh] debug_level = 0[sudo] debug_level = 0[domain/gigenet.local] debug_level = 0
ad_domain = gigenet.local
krb5_realm = GIGENET.LOCAL
realmd_tags = manages-system joined-with-samba
cache_credentials = True
id_provider = ad
krb5_store_password_if_offline = True
default_shell = /bin/bash
ldap_id_mapping = True
use_fully_qualified_names = False
fallback_homedir = /home/%u
access_provider = simple
simple_allow_groups = Operations
sudo_provider = ad
ldap_sudo_search_base = CN=Sudors,OU=Accounts,OU=North America,DC=gigenet,DC=local
ldap_sudo_full_refresh_interval=800
ldap_sudo_smart_refresh_interval=800
With basic user authentication working I wanted to focus on a small feature you most likely noticed within the SSSD configuration template we have provided. This feature is the sudo integration. The documentation on sudo integration is very sparse on the internet with conflicting information. The documentation normally involved a few commands being shown around without any documentation of what the command does. It took me hours to piece the information together with guides, blog posts, and Linux man pages. Hopefully, the information I have detailed out below doesn’t follow this pattern. I still remember the hours of going through SSSD sudo log files line by line as if it was yesterday.
To utilize sudo we have to add the sudo schema to our Active Directory domain. This requires small modifications to the global Microsoft Active Directory schema. Before you perform the adjustments I really recommend doing a full domain backup. Touching the global schema tends to make some administrators very uncomfortable. Our domain is not very large and doesn’t have teams managing it like in some companies. We decided the benefits of centralized user authentication with centralized sudo configurations were worth the small adjustment. It’s also to my surprise that every guide I have found on the internet does not include the location of the actual schema file. I spare you a few hours of research the files are actually located within the actual sudo directory under /usr/share. We have also uploaded this to our GIT repository (https://github.com/gigenet-projects/blog-data/tree/master/sssdblog1)
Let’s dive into applying the schema file. Please ensure you have the ldifde command on your Windows Active Directory domain controller. To apply the schema you will also have to copy over the schema file named “schema.ActiveDirectory” to the domain controller your working on. Start up a powershell command prompt, and enter the command in the snippet below. Don’t forget to substitute the gigenet.local LDAP base with your own domain.
Copyright (C) 2016 Microsoft Corporation. All rights reserved.
PS C:\Users\Administrator\Desktop> ldifde -i -f schema.ActiveDirectory -c dc=X DC=gigenet,DC=local
With the schema applied we should be able to build out our first rule set. Don’t fret I’ll be following through this with a series of pictures to actually design a sudo rule. Before we begin you will need to create a group or a container within your domain where the rules will be configured. This will later be utilized by the SSSD configuration file. Once the group has been configured we will build our rules with the adsiedit.msc tool. Run adsiedit.msc within powershell to open the tool. With the tool open you will now need to transverse your domain tree and go to the domain group you created to store the sudo rules. To build out our sudoRole object started by right-clicking within the Microsoft Active Directory group. Follow the pictures as a general guideline. Our guide will be adding the ping command as a sudo rule. This sudo rule has a few configuration options that we spent many hours exploring on our end. Shall we begin?
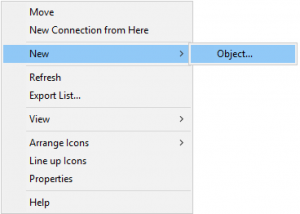
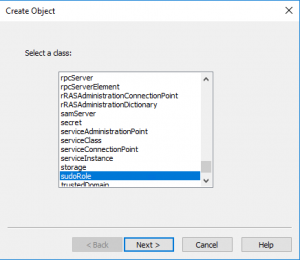
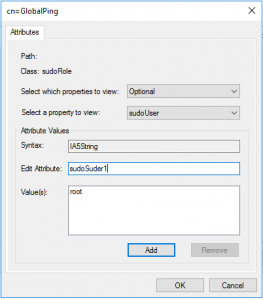
With the right click option we select New->Object Creation. This brings up the second window with a hundred different types of objects. In our case, we select the sudoRole and move onto the next field. This role matches most of the options one would find in the /etc/sudoers file. This leads to a section where we will name the actual sudo rule, and the attributes we can assign to the rule we just named.
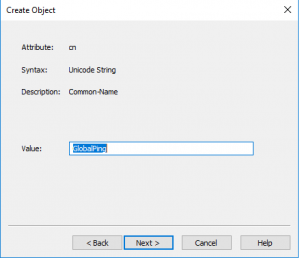
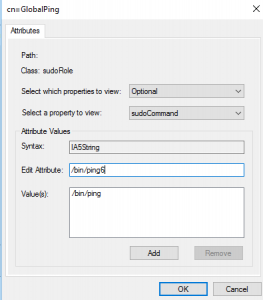
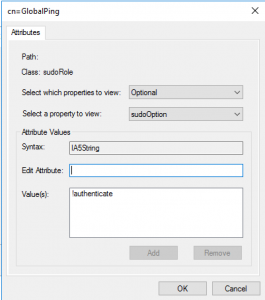
The next three images will basically tell the story about the sudo rule we want to create. The attributes section has dozens of options to tailor your rules to your own design, but we will go through the three simple attributes that you would commonly see in a sudoers configuration file. The story we will describe is one of legend. Our rule will allow us to run the ping command as the root user account and without a password. With the first prompt, you will notice we specify the user account, and the second has a prompt for which commands we want to run. Pro TIP: Look for any extra whitespaces because this can lead to a few extra hours of troubleshooting. Whitespaces will break your rules. In the last image, we add a secret option to run the command without a sudo password. This hidden gem took me about a day to figure out as the internet had almost no documentation on this feature.
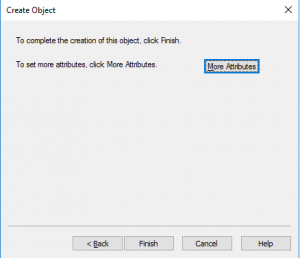
With the basics completed, we can now save the rule. Take a little time to explore all the additional options that can be set as an attribute. It’s worth taking about an hour to explore these options. Now to get this rule working on the actual Linux host we have to go back into our SSSD configuration. Under the SSSD section is a service value where we add the sudo configuration option. We then apply a few sudo options under the domain section. Let me explain each configuration option as they are defined in the configuration above:
- sudo_provider: The provider we utilize to pull in the sudo rules. We are utilizing the Active Directory provider in this configuration.
- ldap_sudo_search_base: The Active Directory base group where we dumped the ping object. This base search will pull in every rule within this domain group, or container.
- ldap_sudo_full_refresh_interval: The interval on which SSSD will look up, and pull new rules into the live sudoer configuration. This allows updates live so you don’t manually need to clear the SSSD cache, and perform a restart.
The last configuration required to get the sudo rules working is a small adjustment to the systems NSS configuration file. Please edit “/etc/nsswitch.conf” to include the following line “sudoers: files sss”. The output below was taken from a live system:
shadow: files sss
group: files sss
sudoers: files sss
This about wraps up our entry-level introduction to Linux authentication through Active Directory. This security practice easily allows you to maintain centralized identity services so you don’t have to constantly push new users to a host, nor cleanup suspended user account. The passwd, and group files on the Linux system stay clean with this method. We will include a second follow up blog in the future that briefly goes through the painful details of adding a public ssh key to each account and storing the key within Active Directory.