How to Secure Memcached Services in Linux
Thursday March 15, 2018
Over the past few weeks, a new DDoS attack vector through the use of memcached has become prevalent. Memcached is an object caching system with the original intent of speeding up dynamic LiveJournal websites back in 2003. It does this by caching data in RAM instead of calling data from a hard drive, thus reducing costly disk operations.
Deeper analysis of the security issues:
Memcached was designed to give the fastest possible cache access, hence it isn’t recommended to leave open on a public network interface. The recent attacks utilizing Memcached take advantage of the UDP protocol and an attack method known as UDP reflection.
An attacker is able to send a UDP request to a server with a spoofed source address, thus causing the server to reply to the spoofed source address instead of the original sender. On top of sending requests towards a server with the intent of “reflecting” them towards another server, attackers are able to easily add to the cache. Because memcached was designed to sit locally on a server, it was never created with any form of authentication. Attackers can connect and add to the cache in order to amplify the magnitude of the attack.
The initial release of Memcached was in May of 2003. Since then, the uses of it have expanded greatly, but the original technology has remained the same. While its uses have been expanded, its security features have not.
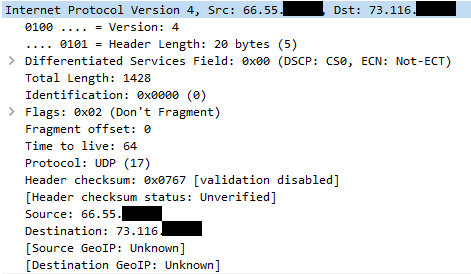
Below is a sample packet we captured from a server participating in one of these reflection attacks. This is the layer 3 information of the packet, the source IP is spoofed to point to a victim’s server:
This is the layer 4 information, Memcached listens on port 11211:

In addition to being able to be used as a reflector for attackers, attackers can also extract highly sensitive data from within the cache because of its lack of authentication. All of the data within the cache has a TTL (Time To Live) value before it is removed, but it still isn’t difficult to pull information from.
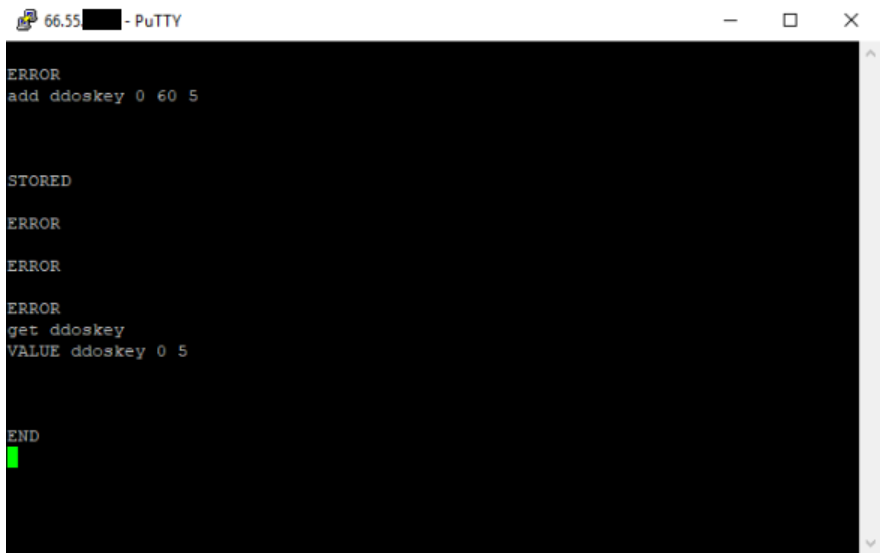
Below is an example of how easy it is for an attacker to alter the cache on an unsecured server. We simply connected on port 11211 over telnet and were immediately able to make changes to the cache:
Solution Overview
In order to decide how to best secure Memcached on your server, you must first determine how your services use it. Memcached was originally designed to run locally on the same machine as the web server.
A: If you don’t require remote access, it is best to completely prevent it from using internet protocol.
B: If you require remote access, it is recommended to whitelist the source IPs of what needs to access it. This way you control exactly what machines can make changes and read from it.
Solution Instructions:
In the case that remote access is not required, it is advised to ensure Memcached can only speak to local host on 127.0.0.1 on startup.
Ubuntu based servers:
sudo nano /etc/memcached.conf
Ensure the following two lines are present in your configuration:
-l 127.0.0.1
This will bind Memcached to your local loopback interface preventing access from anything remote.
-U 0
This will disable UDP for Memcached thus preventing it from being used as a reflector.
Then restart the service to apply the settings:
sudo service memcached restart
CentOS based servers:
nano /etc/sysconfig/memcached
Add the following to the OPTIONS line:
OPTIONS="-l 127.0.0.1 -U 0"
Restart the service to apply the settings:
service memcached restart
If Memcached needs to be accessed remotely, whitelisting the IPs that are allowed to connect will best secure your server.
Using iptables:
sudo iptables -A INPUT -i lo -j ACCEPT
sudo iptables -A INPUT -m conntrack --ctstate ESTABLISHED,RELATED -j ACCEPT
sudo iptables -A INPUT -p tcp -s IP_OF_REMOTE_SERVER/32 --dport 11211 -m conntrack --ctstate NEW,ESTABLISHED -j ACCEPT
sudo iptables -P INPUT DROP
Defining a /32 in the above commands specifies a single server that will be allowed access. If multiple servers in a range require access, the CIDR notation of the range can be input instead:
sudo iptables -A INPUT -p tcp -s IP_RANGE/XX --dport 11211 -m conntrack --ctstate NEW,ESTABLISHED -j ACCEPT
Using CSF:
nano /etc/csf/csf.allow
Add the following line to whitelist IPs:
tcp|in|d=11211|s=x.x.x.x
You can also specify a range using CIDR:
tcp|in|d=11211|s=x.x.x.x/xx
tcp = the protocol that will be used to access Memcached
In = direction of traffic
d = port number
s = source IP address or IP range
Save the file and then restart the service:
csf -r
After whitelisting the IPs allowed to access Memcached, we must rebind the service to use the interface we wish for it to communicate on.
On Ubuntu based servers:
sudo nano /etc/memcached.conf
Change the IP on this line to represent the IP of the interface on your server:
-l x.x.x.x
Then restart the service to apply the settings:
sudo service memcached restart
On CentOS based servers:
nano /etc/sysconfig/memcached
Change the IP following the -l flag to that of your server’s interface:
OPTIONS="-l x.x.x.x -U 0"
Restart the service to apply the settings:
service memcached restart
Conclusion
The best way to secure your server from these vulnerabilities is to prevent Memcached from talking on anything other than the local host. If the service must be accessed remotely, ensure to adequately secure it using your server’s firewall. Securing your server will not only prevent it from being used in malicious DDoS attacks, but also ensure that confidential data isn’t compromised. Taking the above actions will help the community as a whole and prevent unwanted bandwidth overages.